Light rays and lenses
Understanding-oriented. No equipment needed — read this before you build.
Every experiment in the CoreBox rests on one simple model: light travels in straight lines, and lenses bend those lines in a predictable way. This page explains that model — it's all you need for magnifiers, projectors, telescopes and microscopes.
Light as rays
Light is physically a wave (the HoloBox is all about that), but for lenses and mirrors a simpler picture works astonishingly well: draw light as rays — arrows that travel in straight lines until something bends them.
This is called geometrical optics. Its two ground rules:
- In air, rays go straight.
- At a lens, rays are refracted (bent) — glass slows light down, and the curved surface turns that slowdown into a change of direction.
Focal length: the one number that defines a lens
Send rays parallel to the axis into a converging lens and they all cross at one point: the focal point F. Its distance from the lens is the focal length f, given in millimetres and printed on every CoreBox lens holder (50, 100, −50).
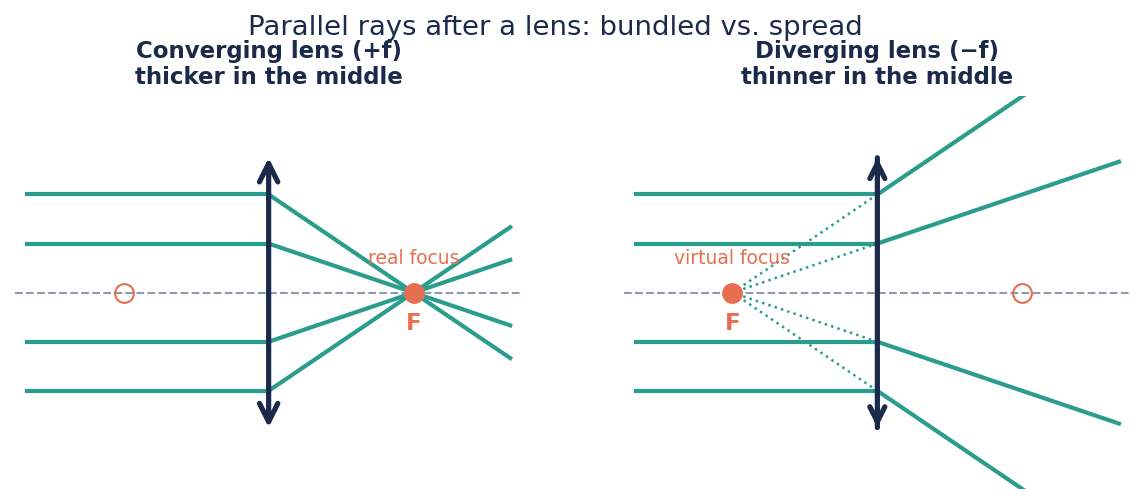
- A converging lens (+f) is thicker in the middle. Parallel rays are bundled into a real focus behind the lens — you can catch it on paper (that's also how you measure f).
- A diverging lens (−f) is thinner in the middle. Parallel rays spread out as if they came from a virtual focus in front of the lens. Nothing to catch on paper — but your eye can follow the spread-out rays back and "sees" that point.
Sunlight (parallel rays!) through the 50 mm lens makes a hot bright dot at 5 cm. The −50 mm lens never makes a dot, no matter how you hold it. That's the entire difference in one experiment — with the usual warning: never look at the sun through any lens.
A handy way to compare lens strength is optical power (f in metres), measured in dioptres — the number on glasses prescriptions. The 50 mm lens has +20 dpt, the 100 mm lens +10 dpt, the −50 mm lens −20 dpt. Shorter focal length = stronger lens.
The thin-lens simplification
Real lenses have thickness, two curved surfaces, and imperfections. For everything in the CoreBox we treat each lens as a thin lens: a single flat plane that bends rays, described completely by its focal length. This is why we can draw clean diagrams and calculate with one small formula (next page).
Where the simplification leaks, you can see it in your builds:
- Chromatic aberration: glass bends blue light slightly more than red, so each colour has its own focal point — the colour fringes at high-contrast edges.
- Spherical aberration: rays through the lens edge focus slightly closer than rays through the centre — the image can't be perfectly sharp everywhere at once. This is also why lens orientation matters in your builds: with the curved side facing the parallel beam, the bending is shared between the two surfaces and the error shrinks.
Finding these errors in your own setup is not failure — it's exactly what optical engineers are paid to fight.
Three rays you can always draw
For any object and any thin lens, three special rays are enough to construct the image (watch them at work in the animation on the next page):
- The parallel ray — runs parallel to the axis, then bends through the image-side focal point.
- The centre ray — passes through the lens centre unbent.
- The focal ray — passes through the object-side focal point, then leaves the lens parallel to the axis.
Where they cross, the image is. That construction — nothing more — explains every instrument in this box.
Where this shows up in the CoreBox
| Idea on this page | You'll meet it in… |
|---|---|
| Focal length | Measure a focal length |
| Converging lens forms real images | From lens to projector |
| Diverging lens | Galilean eyepiece in Build a telescope |
| Ray construction | How images form |
Next: How images form →